Monday 30 September 2013

Russian Black Bread - Part III

Russian Black Bread
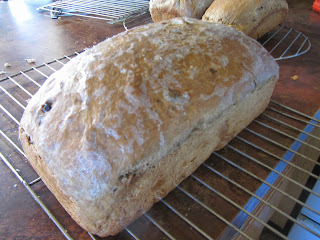
... what is glistening on the crust is butter that has just melted there ...,
When the butter melts that shine will be gone.
Now it is a function of the light coming in through the window. .
How to Get Dough to Rise

I asked Marcia if she had one question about making bread, what would it be.

“How do I get the dough to rise as high as yours does?”

So?

I have  potential answers.

1. Tonight, the guys who live here told me that their bread raises the best when it is put above my fridge. There is a small space between the fridge and where cupboard begins, just large enough to fit my bread dough pan. I tried it. It worked. Find such a place in your house. Just a little bit warmer than other places.

2. I usually achieve a warm space by turning a little heat into my oven, then turning the oven off and letting the bread sit there for 30 to 50 minutes. If some other adult lives in your house, you can have a disaster if they turn on the oven to preheat it for cooking they are going to do.

3. I also make sure the bread is in a place where the sun is shining through the window, if I am making it in the winter. In the summer, I take it outside and leave it in the sun but I have to watch it there, for it comes rises so quickly. If I am not ready to proof it in the pans, I just have one of the kids run out and punch it down and then wait until it comes up again. This is not the main reason that I like to show kids how to punch down bread, but when they learn, it is a nice side effect to be able to say to a grandchild, “Will you go punch down the bread” and then they can go do it. I was charmed once seeing Ceilidh do this when she was only about 9 years old.

4. I make sure the dough is soft. Very soft. Marcia reminded me that when we were making the bread with a unit that has a dough hook, that I thought the machine was working too hard and told her to let it work more easily by keeping back the last cup of flour to the last. I guess that would work. All of us have machines with different powers. Know your machine. If the manufacturer has a dough hook and says you can run it 10 minutes, then do so.

5. For sure – let your machine run at leave 5 -6 minutes for white bread and 8-10 for brown bread. Don’t overbeat and let the machine work for 20 minutes. You will undo your good results and your bread will fall.

6. This doesn’t mean you can’t make good bread by hand. Just don’t expect to achieve the same fine textured results that can be achieved with a machine that will mix your dough. Don’t try to replicate all of that mixing of the dough by hand. You have better things to do with your time than knead bread by hand for 8 minutes. I beg you go read or book or have a rest. Just make the dough you are doing by hand, very soft. Very soft. Very, very soft. You have to handle it, so don’t make it so soft that you can’t handle it. Remember the flour hasn’t really absorbed all of that water and in the time that you are letting it raise, it will get drier as it absorbs the liquid. I have been known to just get it into a smooth clump and then leave it. Let the yeast do the work. Nobody is going to reject that bread because its texture isn’t fine enough. A little butter or raspberry jam on the table and it will go as fast as any other loaf.

7. Don’t rush getting at the dough before it has fully risen. Let it rise until it is double in bulk, going to double-and-a-half in bulk. Be patient. You are home for the day anyway. No rush. I used to see my mother’s dough rise and then fall over the sides of the pan. She used to put hers down by the furnace pilot light to get that little bit of extra heat for the bread. She would just scoop it up and punch it down again.

8. I have a recipe that calls for 1 tsp of yeast to make the pizza dough. But you have to let it raise 18 hours. I am telling you this because the yeast will do its work if you leave it long enough. Most bread recipes have enough yeast in there to make the dough rise. We don’t have to wait that long with bread – 18 hours. Usually it is double in bulk by an hour and a bit ... or maybe less.

Did you see any tips there that you can use, Marcia?
Russian Black Bread - Part II

... bread has proofed, doubling in size ...
I am doing a lot of blogging about bread. That seems to be the thing a lot of people have asked me about: Marcia, Jamie, Mary, Joaquim, Amir, Laynie, Mati. It didn’t seem fair to talk about it and not put up some pictures – not ones I skimmed off of the internet, but a show and tell about how the bread is done in my kitchen.

I believe bread is something you can do in between other things in the day, until you aren’t aware that it has taken any time. So without thinking about my days schedule, I just got some going.
... loaves have been baked and are ready to turn out of the pans ...
I can't capture the smell for you. Too bad

I put yeast in some warm water in my bread bowl. Then I ran over to Miranda’s house while it was taking its three minutes to dissolve. They asked me to stay for pancakes. I got back 30 minutes later and added the rye flour, incorporating it into the water and yeast while I pulled out the other ingredients.

So it sat in the bowl while I discovered I had no chocolate. I always substitute some chocolate and margarine, when I am out of chocolate, but I couldn’t find my tin of cocoa upstairs. I just don’t run out of some things: cocoa, cinnamon, a bag of flour, bran, lots of yeast – you can count me if you need to borrow these. I always have back ups.

Finding the cocoa was a task – when it is downstairs and not in its rightful place in the upstairs cupboard.
... trying to save a mess by putting it on a nice dish ...

 By this time the dough was looking like a sponge. And this bread was taking more time than usual – finding the instant coffee granules, trying to use up the last of the molasses which now have to be dug out of the bottom of the carton to get ½ a cup. While my bread usually gets together fast, this was taking a few minutes longer and added to that I had taken on the task of cleaning out one of the kitchen cupboards as I went.
... we don't know if the pan wasn't greased enough or
if we should have put parchment paper on the sides and bottom
or if we used one of the cheaper pans
or perhaps this just happens to everyone, sometimes ...

I finally got a soft dough made, some raisins thrown in at the end.

Since I don’t like raisins that much I shorted the recipe by ½ a cup, which I wished I hadn’t when I tasted the product later.

 The extra raisins would have been nice.

Once I got the dough into my big metal bowl and was washing up my bread mixing bowl, that is when I remembered I hadn’t put the vinegar into the bread. I measure it out and poured it over top of the bread, trying to incorporate it by hand. A few people came through the kitchen and kept me company while I messing and squishing the vinegar in.


... please take a piece.. watch it ... tall slices don't have raisins ...
When the bread had doubled in size, I had to run off to an appointment.

 Amir said he would finish it off for me.

 He rolled it into loaves, greased the pans and baked it while I was gone.

Later when someone thanked us and asked who had made the bread, neither he nor I could answer, since ... well, neither of us had taken it from start to finish.
"I'll take mine with cream cheese."

You will see that when he took the loaves out of the pan, one of them stuck to the side and then fell apart, so there was that mess on the counter.

We cut it first to eat it. I selected a nice serving dish, trying to compensate for the breads lack of traditional form.

 I don’t know what to say about it taste, except that if this were served as sacrament bread, you could double the size of the congregation in no time.
...  only a bit of butter is left, but there is still lots of bread ...

I ate my first slice plain. Kelvin put butter on his. Pouria loaded his with cream cheese.

Connor took his piece of new bread and toasted it to give it a nice crust on both surfaces.

 Some of us tried every method: butter, cream cheese and toasted.

Even people who were full, ate.

His German roommates think Connor's beer is the best.
Glen thinks it is better to go to Germany
and drink German beer.
We can’t say which is the best bread ever.

Maybe the best bread ever is the one we are eating at the time.

But this one was glorious.

Connor thought beer would go well with the home made bread.  I asked him when he was going to contribute his beer recipes to this blog.  He said he doesn't tweet, do facebook or blog.  He only like to make beer and have a piece of Russian black bread on the side.

Arta

Russian Black Bread

2 ½ cups warm water
2 packages Traditional Active Dry Yeast
¼ cup butter or margarine, softened
¼ cup white vinegar
¼ cup molasses
1 ounce unsweetened chocolate, melted
2 /12 teaspoons salt
2 teaspoons instant coffee granules
1 tablespoon fennel seeds
3 ¾ to 4 ¼ cups all-purpose flour
4 cups rye flour
¾ cup raisins

old cookbooks are good cookbooks
...published 1977...
Place ½ cup warm water in large warm bowl. Sprinkle in yeast; stir until dissolved. Add remaining water, butter, and next 6 ingredients. Slowly stir in 3 cups all-purpose flour; blend well. Stir in rye flour, raisins, and enough remaining all-purpose flour to make soft dough. Remove dough to lightly floured surface. Cover; let rest 15 minutes. Knead dough until smooth and elastic, about 8 to 10 minutes. Place in greased bowl, turning to great top. Cover; let rise in warm, draft-free place until doubled in size, about 1 ¼ to 1 ½ hours.

Punch dough down. Divide dough in half. Shape each half into 5-inch ball. Place each ball in greased 8-inch round cake pan or on large greased baking sheet. Dover; let rise in warm, draft-free place until doubled in size, about 1 hour.

Bake at 350 for 45 minutes or until done
.
... page 21 ...
Notes from Arta:

Today I am thinking of taking a new moniker: the Careless Cook. Since I am typing out these recipes I am thinking – well, I am careless.  I only glance at the ingredients and then decide where I will substitute so that I can get the bread made in 10 minutes and be off dong some other job. I may use the rye flour, but I may just use brown flour. I look at the chocolate the recipe calls for and eat it, Then I substitute the chocolate with cocoa and a bit of margarine. I don’t like round loaves – I make traditionally shaped loaves.

This recipe is from Sunday’s at Moosewood. I like the taste of the bread – I would rate it among my top 10 bread recipes. And what would the top five be? Country Seed Bread, Multi Grain Bread, Russian Black Bread, Whole Wheat Bread and I have yet to select the last of the top five.

Arta

Sunday 29 September 2013

Country Seed Bread

2 cups (approx) all-purpose flour 
1 cup whole wheat flour 
¼ cup flax seeds 
2 tbsp sesame seeds
1 tbsp poppy seeds
2 tsp quick-rising instant dry yeast 10
1and 1/4 cups water 
2 tbsp liquid honey
2 tbsp vegetable oil
1 ½ tsp salt 
... ordinary white bread ...

1. In large bowl, stir together all-purpose and whole wheat flours, flax, sesame and poppy seeds and yeast. In small bowl, whisk together water, honey, oil and salt; stir into flour mixture until sticky dough forms.

2. Turn out dough onto lightly floured surface. Knead for about 8 minutes or until still slightly sticky and dough springs back when pressed in centre, adding up to ¼ cup more all-purpose flour as necessary. Place in greased bowl, turning to grease all over. Cover with plastic wrap; let rise in warm draft-free place until doubled in bulk, about 1 ¼ hours.

3. Punch down dough; turn out onto lightly floured surface. Gently pull dough into 11 x 8 inch (28 x 20 cm) rectangle. Starting at one narrow end, roll up into cylinder; pinch along bottom to smooth and seal. Fit into greased 8 x 4 inch loaf pan. Cover and let rise until doubled in bulk and about ¾ inch above rim of pan, about 1 hour.

4. Brush top of loaf with water. With serrated knife, make one 1-inch deep cut lengthwise along top of loaf. Bake in center of 400 degree F oven for 15 minutes. Reduce heat to 350 degrees F; bake for 30 to 35 minutes or until browned and loaf sounds hollow when tapped on bottom. Remove from pan; let cool on rack. Makes 1 loaf, 12 slices
... look of dough after beating for 8 minutes ...
still a very soft dough

My Notes: 
I always triple this batch and get 3 very large loaves. I don’t make the serrated cut down the loaf – it always just looks like the loaf has fallen to me. I don’t like that look. I have pencilled in on my recipe, the tripled ingredients so I don’t have to think that out every time. Although I call the Multi-Seed Bread my all-time favorite recipe, I think most people would say this is a better bread. Not as dense. The multi-seed bread takes more chewing. This one is more like cake. The seeds give a fantastic aroma. And the bread is so delicious to eat. 

Have I mentioned that I always take margarine and rub it over the outside of bread when it comes out of the pan. It softens the crust and makes it easier to cut – not so many crumbs on the kitchen floor, especially if you let all the kids cut the bread themselves, which I do. 
... sesame seeds, flax and poppy seeds ...
essential ingredients for Country Seed Bread

I don’t cook any loaves of bread for 45 minutes as this recipe suggests. In my oven the large loaves are done in 37 minutes at a temperature of 350 degrees Farenheight – and 33 minutes for smaller loaves. Experiment and see how dry you want your loaves to be. 

This recipe is from page 22 of Canadian Living’s Best Breads & Pizzas. My colleague at the library, Dani Pahulje, tried the recipe and passed it on to me. 

If  you would like a word copy of this recipe, email me at ajohnson@ucalgary.ca and I will send you one.

For Catherine, I am typing in the LARGE BREAD MACHINE METHOD

  • Into pan of 1 ½ to 2 lb machine, add (in order) water, honey, oil, salt, all-purpose and whole what flours, flax seeds, sesame seeds, poppy seeds and yeast.  (Do not let yeast touch liquid.) Choose appropriate setting (whole wheat, powdered milk).  Let baked loaf cool on rack.  Makes 1 loaf which is not enough.

Arta

Saturday 28 September 2013

Garlic Bread


Roast Garlic Bread from Canadian Living

Ingredients

1 garlic head
3 tbsp (45 mL) extra-virgin olive oil
1/2 tsp (2 mL) granulated sugar
1 cup (250 mL) warm water
1 pkg active dry yeast, or 1-1/4 tsp/11 ml
2 tbsp (25 mL) finely chopped oil packed sun dried tomatoes
1 tsp (5 mL) salt
1 cup (250 mL) multigrain flour or whole wheat flour
2 cups (500 mL) white bread flour
Preparation:

... garlic bread ...
I wish I had added olives.
Slice top off head of garlic; place garlic on foil and drizzle with 1 tbsp (15 mL) of the olive oil. Wrap and bake in 375°F (190°C) oven for 45 to 60 minutes or until garlic is softened. Let cool. Squeeze out pulp into small bowl; mash and set aside.

In large bowl, dissolve sugar in warm water; sprinkle in yeast and let stand for 10 minutes or until frothy. Stir in remaining oil, tomatoes, salt and mashed garlic. Stir in multigrain flour and 1-3/4 cups (425 mL) of the white bread flour to make sticky dough.

Turn out dough onto lightly floured surface; knead for 8 minutes or until smooth and elastic, adding as much of the remaining flour as necessary. Place in greased bowl, turning to grease all over. Cover with plastic wrap; let rise in warm place for 1 to 1-1/2 hours or until doubled in bulk.

Punch down dough; turn out onto lightly floured surface. Pat into 11-inch (28 cm) circle. Roll up into cylinder with tapered ends. Pinch along bottom to smooth and seal. Place on parchment paper-lined baking sheet. Cover and let rise for 1-1/4 to 1-1/2 hours or until doubled in bulk. (I baked my in regular bread pans.)

With sharp knife, cut 4 shallow slashes diagonally across top of loaf. Bake in centre of 375°F (190°C) oven for about 40 minutes or until loaf sounds hollow when tapped on bottom. Let cool on rack.

Additional Information:

• Variation Bread Machine Roasted Garlic and Sun-Dried Tomato Loaf (for dough only):

Roast garlic as directed. Into pan of 1-1/2 to 2 lb (750 g to 1 kg) bread machine, place (in order) water, sugar, remaining oil, salt, roasted garlic, tomatoes, bread flour, multigrain flour and 1-1/4 tsp (6 mL) bread machine yeast. (Do not let yeast touch liquid.) Choose dough setting.

Friday 27 September 2013

Brown and Serve Rolls, Part II

 ... bake 27 - 33 minutes... 350 F.
There are many ways to get a golden colour on the buns. My favorite is to use part milk and part water in the recipe, and the milk solids will make the buns this golden colour. If I choose to use only water in the recipe, I have a lighter coloured tray of buns. You can also use a wash of egg yolks to get the brighter colour.
... keep the loaves covered with plastic while they rise ...
I am ahead when it comes to collecting grocery bags, so I split mine with scissors so that they will cover the loaves or the bread while it is rising, sometimes using more than one. If you look way back in the picture, you can see I have also used this method for another set of bread that is rising. When Laynie and I had our bread-making day, we were just concentrating on getting a feel for the dough, so we made 3 different batches of bread. By the time she was finished she felt comfortable with the dough and was saying, "Hey, this isn't difficult at all. Easy, actually."
... bread pans from the past ...
The bread pans here are old, cast-offs from a professional bakery, though you can buy them new like this. There is no other way to get a high loaf with straight side, than to have a pan that will give you that shape, and these pans do that. When I first got these pans, I had one set cut into 3 individual pans because I had an oven that would take four loaves at a time. I like having them together -- they are easy to put in and pull out of the oven this way.

Arta

Brown and Serve Rolls

 ... extra rolls placed in small bread tins ... let double  in size ...
Billie Bates
(makes 10 dozen small)

18 c. flour (approx., add last)
2 c. milk – scalded
3 c. cold water. Add to scalded milk
4 tsp sugar
4 pkgs. yeast. (each is 1 TB of yeast)
8 eggs well eaten
8 tbsp. butter or oil (1/2 c.)
2 tbsp. salt
12 tbsp. sugar (3/4 c.)

1. Add the sugar and yeast to the milk/water which is luke warm. Let stand 10 min.

2. Beat the last four ingredients together. I use my blender. Then add to the yeast mixture.

... dough has risen ... it was originally half this size ...
... butter pan well ...
Greg Bates’s mother showed me how to make this recipe many years ago. 


She came to my kitchen. 

She coached me as to how soft to make the dough and how long to let it raise before rolling it into buns. 

 As well, she showed me the bun rolling method she had learned when she worked in a bakery. 

“If you practise long enough you will be able to roll with both hands,” she said to me. 

When I got good with one hand, I did try the two handed method, which I will be happy to demo for anyone. 

You just have to get both hands going at the same time, in opposite directions, both rolling in to the centre of your body at the same time.

Billie copied the recipe from the back of a bag of bread and quadrupled it.

I usually get two full pans – the large cookie sheet size or about 70 plus buns. I never make them small enough to get 120 as the recipe suggests.

... cut dough in even chunks and begin to roll ...
On this recipe there is a note as to how Billie turns these into Hot Cross Buns.

Use brown sugar.

Add 3 tsp cinnamon and 1 tsp each of cloves, nutmeg and allspice.

I have a more complicated recipe for Hot Cross Buns so I didn’t ever try her tip on this one.

Laynie and I tried this recipe the day we got together and made three batches of bread.

Why not, we said.

Amir  does a good job and I am done twice as fast.
We are just practising, and if we don’t want to complete any of the recipes, we can just take the dough down and feed it to the fish.

We didn’t have to do that.

I made this recipe again this week – for Michael’s 2nd birthday party for Richard and Miranda were serving pulled pork.

That is when I got the idea that if I took a few pictures it would give you a better idea of how high to let the dough rise and how far apart to put the buns on the large trays.

 ... 3 x 5 card now photocopied with notes added ...
For a long time I I had Billie's recipe on a 3 x 5 card .

Then I photocopied it so that I could have it in a binder that I keep all of my bread recipes in: waffles, pancakes, tortillas, roti, buns, specialty breads, etc.

I try to attached notes now to all of the recipes.

The reason that I have a special binder for Breads, Soups, etc., is that Norma Leavitt and her sisters published a cookbook.

Norma told me that it was so much work and that if you have good recipes, it is a better idea to just put them in a binder and have that book for yourself.

My Bread Binder
 So I began to do that.  Now I have separate binders, one out at the cabin and one here at home.

That is a bit much, for the recipe I want is usually in the binder that is at the other house.

I was wondering about the recipe -- the part that asks a person to scald the milk.  I did a google search  on scalding milk and at http://www.cooksinfo.com/scald I found the following information:

"Howard Hillman, travel and food journalist, writes: "Scalding has two primary purposes: to kill pathogenic microorganisms and to destroy certain enzymes that would keep emulsifying agents in the milk from doing their thickening job. Since those two goals are accomplished when milk is pasteurized at the dairy, scalding need only be done when you use raw (unpasteurized) milk. Many cookbook writers do not know this fact and therefore direct their readers to scald the milk even though it is usually unnecessary today."

I am satisfied that scalding the milk is a step I am not going to take.

Arta

Thursday 26 September 2013

Fig and Fennel Bread


While eating some of the warm Fig and Fennel Bread I had just pulled out of the oven, Joaquim asked me if I had a list of the different kinds of bread I can bake. 

“Yes,” I said, and pointed to the inside of my head. 

“That is not going to help me much,” he said.

To tell you the truth, it doesn’t help me much either.  I wondered to myself if I really do have a list like that in my head and my mind began to spin from the most recently made, to loaves I made long ago. 
The Fig and Fennel Recipe comes from Epicurious.com (Bon Appetit 202) and I thought as I was eating my second piece of it, that I hadn’t made anything quite that spectacular ever.  I am not a bread eater, but I went on to eat three toasted pieces of it tonight after  coming home from listening to live folk music.  As I was watching the butter melt into the crust I remembered going to another internet site where they said they had a recipe that improved on the one at ecipicuious.com recipe, which they thought was bland. 
I am not chasing down the new recipe they refer to – since I thought I had ambrosia in my hands already.

Mary had me test out a Roasted Garlic Bread recipe when I was in Ottawa and she declared that it was definitely a winner. 

The week before, Lisa and I had experimented with Saffron Bread, since she and I had been trying to get a sense of what saffron really tasted like by holding some of it on the tip of our tongues until we thought our minds had a memory for it.  Later that day I read the saffron has to be dissolved for about 20 minutes for the true flavour to come out.  No wonder Lisa and I thought it tasted like paper mache when we were doing our spice experiment with it.

Then I was reminded of the breads we ate last summer:  the Russian Black Bread that had hints of cumin, chocolate and molasses; the Danish Sesame Bran Bread that made the air so fragrant when it was toasted.  

My own personal favourite was the Cheesy Moon Bread filled with parmesan cheese, stuffed green olives, basil, garlic powder, oregano leaves and paprika.

We ate the Country Seed Bread all summer as well.  I don’t know what it is about flax, poppy seeds and sesame seeds that made those “country seeds”, but that bread began to be preferred over a loaf of hot white bread.

If sheer volume of the kinds of bread I make was the measure of what is a favourite, Aunt Erva’s Cinnamon Bun recipe would take the prize.   On the other hand, when Easter is close, wouldn’t some homemade Hot Cross Buns be the first thing you would want to pop into your mouth?

Well, it is hard to make a list of every kind of bread, let alone choose a favourite.  One day I had four loaves of fig and fennel bread on the counter, one cut already, and when David came into the room he asked for a piece from a loaf that was not cut. 

“We all get one,” he announced, “and I want a piece of my own loaf.”

I have never divided the loaves up that way before, .... but why not?  There were four of us in the house.

One loaf each of us.

Arta
Originally published: http://larchhaven.blogspot.ca/2011/04/fig-and-fennel-bread.html

Fig and Fennel Bread - The Fresh Loaf


8oz bread flour
8oz whole wheat bread flour (or more white)
4oz whole grain rye
13.5 oz of room temperature water
2 tbs butter, melted
2 tbs blackstrap molasses
1 1/2 tbs fennel seeds, toasted
1 tbs caraway seeds
1/4 cup rye berries, popped (heat it a dry skillet, they pop like popcorn!) Hulled barley or walnuts substitute well but in general this ingredient in entirely optional 6oz calimyrna dried figs chopped coursely (other vareties are ok, I would avoid black mission figs though, they're a bit too sweet.
2tsp instant yeast
1 1/2 tsp kosher salt
************************
The procedure's fairly standard, but there are a few things worth mentioning along the way. From start to finish, this will take about 5 hours.

1. Combine flours, seeds, salt, yeast and berries; whisk together
2. Combine butter, molasses, and water; whisk together
3. Combine above. Bring dough together. Knead like mad.
4. Once your dough passes the membrane test, add chopped figs and knead just to distribute figs. Note: If you knead for to long you can pulverize the figs which on top of all the germ and bran, molasses and berries really prohibits bubble formation. Still tastes great but I generally prefer a lighter bread with good sized chunks of figs.
5. Form dough into a tight ball, oil a bowl, toss to coat, cover and let it ferment until it has doubled in size.
6. Preheat oven, baking stone(bottom rack), and cast iron skillet(top rack) to 425F.
7. Shape your loaves (usually 2) on durum or cornmeal, and let them proof at room temp until they look ready to go, about doubled in size. Note: For a dinner party I once made 2oz round rolls, dimpled the center and plopped on a dollop of tangy goat cheese and let the rolls proof around it. If you do this, bake the rolls on a half sheet pan, at the temp as below, without steaming your oven.
8. Right before you put you loaves in, pour ~1 cup of water in the skillet, plop them in, then spritz with water at 1 minute intervals for the first 3 minutes of baking.
9. About ten minutes in, rotate your loaves to ensure even browning. When they look done, check for 200F.
10. Once they hit temp, get 'em on a cooling rack, wait, then eat. Best served toasted with butter, goat or cream cheese.

The final loaf has a chewy, thick crust and a soft moist interior. If you find your figs are too dry inside, mascerate them next time (I've never needed too). Chances are you'll have a burnt fig chuck or two on the exterior of you loaf. If that's going to get to you, just pluck them off before you put your loaves in the oven. I've tried topping loaves with rye bran, rolled rye or oats, and kosher salt and fennel seeds all of which looked tasted great. I'm sure there are more tasty ideas out there (I'm trying pecorino shavings next week)! This figgy bread makes a great figgy puddin' substitute at that annual Christmas party. You can find the 'original' recipe here.  
Taken from www.thefreshloaf.com

Tuesday 24 September 2013

Cinnamon Buns : Great Aunt Erva's Way


I got together with some friends to show them how to make cinnamon buns. Now while I called this "Cooking with Mary" to them, it could have been "Cooking with Wyora", or Cooking with Aunt Erva", or cooking with any one of my maternal aunts.

But if you haven't had the chance to do any of that ... then here is the basic method.

Start with Master Bread Dough.  Any bread dough recipe will do.  My mother uses water for the liquid and oil for the butter.

Ingredients

6 to 6-1/2 cups all-purpose flour
3 T sugar
2 envelopes active dry yeast
2 t salt
1 ½ cups water
½ cup milk
2 T butter

How to make the dough:

Combine water, milk and butter; heat until warm (100℉ to 110℉). Add sugar and yeast; let stand 5 minutes. Add 2 ½ cups flour and salt; beat 2 minutes at medium speed of a bread mixer, scraping bowl occasionally.

Beat in enough remaining flour to make soft dough. Knead for 5 minutes in your bread mixer.

Place kneaded dough in greased bowl, turning to grease top. Cover, let rise in warm, draft-free place until doubled in size, about 1 to 1 ½ hours.  You can punch the dough down once if you like.

Here is the cinnamon bun wrapping method from my childhood:

Cut off a chunk of dough.

Stretch it so it is long.

Dip in melted margarine or butter.  Butter tastes better.  Margarine is cheaper and if you are going t make pan, after pan, you might usually use the margarine.  But for a more divine taste?  Butter.

Drop in bowl of yellow sugar and cinnamon.  You choose how much sugar to cinnamon.  We like lots.

Coat dough.

Tie it in a knot.

Drop it an 8 x 14 pan.

The buns should lightly touch but not be too squished together.

Let rise until double.

Bake at 375 for about  27  minutes.

Dump out of pan immediately and upside down.

Enjoy hot on the end of a fork.

Variation: sprinkle maraschino cherries in the pan before you put the buns on top. When you dump out the pan, it looks beautiful and tastes great too.

Mary

Of vegetarians, feminists and Mexican tomato-lime soup to die for

Back in 1995 when this vegetarian recipe book came out, the only vegetarians around were hippies and feminists. In the early 90s I was lucky enough to be attending dozens of feminist potlucks with my mom and sisters. Arta had purchased some Moosewood Restaurant cookbooks and we had fun trying all sorts of recipes. This soup was (and still is) one of my absolute favourites.

Mexican Tomato Lime Soup

  • 3 cloves garlic, minced or pressed
  • 2 teaspoons ground cumin
  • 1 Tablespoon vegetable oil
  • 6 cups tomato juice
  • 2 cups chopped fresh tomatoes
  • juice of 1 large lime (~ 1/4 cup)
  • 3 Tablespoons chopped fresh cilantro
  • Tabasco or other hot pepper sauce to taste ---
  • 2 cups coarsely crushed tortilla chips
  • 1 cup grated Monterey Jack cheese
  • cilantro leaves, whole or chopped

In a soup pot on low heat, saute the garlic and cumin in the oil for a minute. Be careful not to brown the garlic.

Stir in the tomato juice, fresh tomatoes, lime juice, and cilantro. Bring to a simmer and continue to cook for several minutes. Add Tabasco to taste. Place the tortilla chips in large, shallow soup bowls, and ladle the soup over them.

Top with grated cheese and cilantro.

Note: This soup is also delicious chilled. After adding Tabasco, refrigerate for about 1 1/2 hours or until ready to serve. Top with fresh avocado cubes.

Mary